Introduction
Salesforce.com (abbreviated as SFDC) is the world's leading Software-as-a-Service (SaaS) application that primarily deals in offering CRM software to its consumers. SFDC has contributed immensely to this era of cloud adoption on the applications front. It has seen incredible growth in recent times and has over 100K (and counting) customers already.
IBM Integration Bus (abbreviated as IIB) is IBM's offering in the ESB/middleware space. It was formerly known as Websphere Message Broker. Until recently, the middleware platforms were needed primarily for integrating on-premise applications, especially in a complex application landscape and as the foundation for enabling SOA in a more architecturally (all three disciplines: business, application and infrastructure) mature organizations.
These days, middleware is also needed for integrating on-premise apps with cloud apps in a hybrid IT landscape.
Coming back to SFDC for a moment, even though to the business consumer, SFDC is a business app but its core functionality and power in reality resides in its underlying platform on which the app itself is hosted.
This platform, knows as Force.com exposes a number of means for the consuming apps (middleware included) to integrate with the application, this article focuses on one of them, the REST API.
This article is divided in the following two sections:
- The SFDC Setup
- Consuming SFDC via IIB
The SFDC Setup
Before moving to the IIB side, SFDC needs to be configured appropriately for the platform to handle REST based requests.
- Connected App: Offers a mechanism to integrate the external client with Salesforce using the API and helps authenticate the client using OAuth2.0:
- To create the connected app, follow these steps:
- Setup -> Build -> Create -> Apps -> Connected Apps -> New (Button)??
- To create the connected app, follow these steps:
- Please provide the following information in the given fields (bare minimum per the scope of this article)
- Connected App Name: Test Connected App
- API Name:
Test_Connected_App(this is the technical name of the app that can be referred inside the given client app, this gets defaulted to the same name as the Connected App Name, minus the spaces) - Contact Email: This is the email that SFDC uses to contact you or your support team
- Under the API (Enable OAuth Settings) section:
- Select Enable OAuth Settings
- Callback URL: This field contains that URL of the app to which Salesforce can callback on. Typically, this is the URL that the user's browser gets redirected to after successful authentication. This field is not needed in our case and therefore I am putting in a test/dummy value in this mandatory field
- Select Access and manage your data (api) option from the "Available OAuth Scopes" selection box
- Hit Save at the bottom of this page
- Following is a screen-grab of the create connected app page, for reference:

- Your connected app is now created. Please give it 2-10 mins to take affect. In the meanwhile, please make a note of the following two parameters that are now available on this newly built connected app.
- Consumer Key
- Consumer Secret
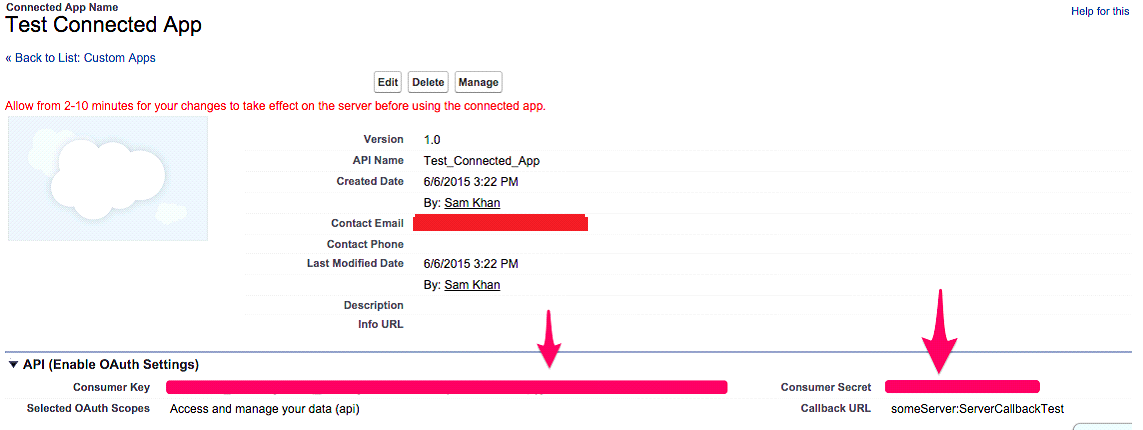
- These params are needed for the client authentication at runtime, in-fact the following 5 params are needed for a successful login attempt using the Username-password OAuth flow:
- Username: Your Salesforce User ID
- Password: Your Salesforce account password + User Token associated with your account (this in-fact is a concatenation of the two values)
- Consumer Key: This will be supplied as the
client_idparam in the http request for login - Consumer Secret: This will be supplied as
client_secretparam in the http request for login - The string value
password
We are now done with the SFDC ground work preparation, now moving off to the IIB part:
Consuming SFDC via IIB
For the benefit of the readers of this article, I developed a sample application in IIB to demonstrate the integration part with SFDC.
The application performs the following functions:
- Receives a request message in the input Q
- Logs into SFDC using Username-Password OAuth pattern
- Creates an account in SFDC based on the contents of the request message received in the input Q
- In case of a successful account creation, put the ID of the created record and the status of the request (both fields are returned by SFDC) in an outgoing XML message that is put in the output Q
Here is the XML request:
Hide Copy Code
<SFDC_Create_Source>
    <Account>
        <AccountName>Test Account 1</AccountName>
        <AccountNumber>123</AccountNumber>
        <Type>Prospect</Type>
    </Account>
</SFDC_Create_Source>
You should be able to find this in the project file attached. Here is the screenshot for reference.
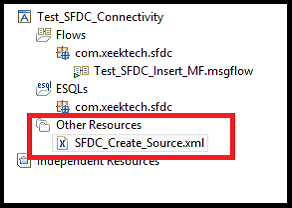
The elements in this xml Account/AccountName, Account/AccountNumber and Account/Type are the params that we will be supplying in our create message before firing it off to SFDC so that an Account record is created there with the provided information.
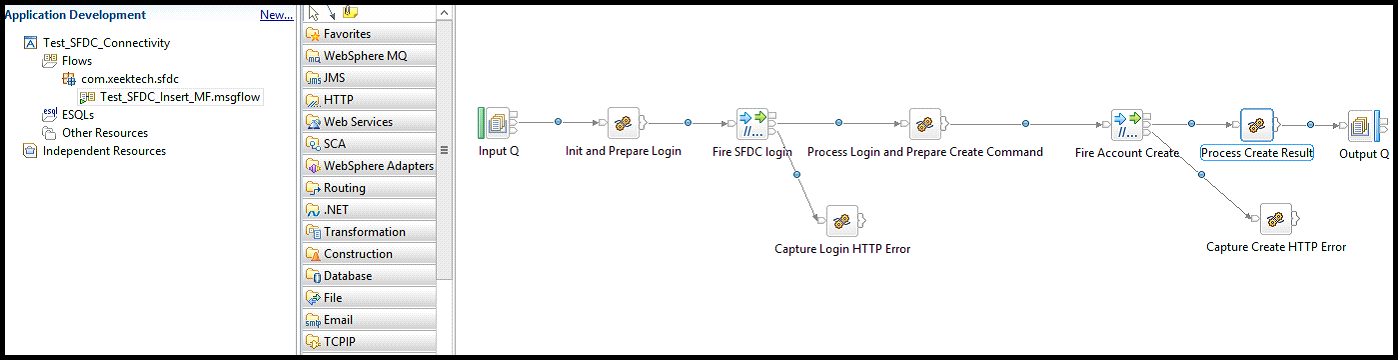
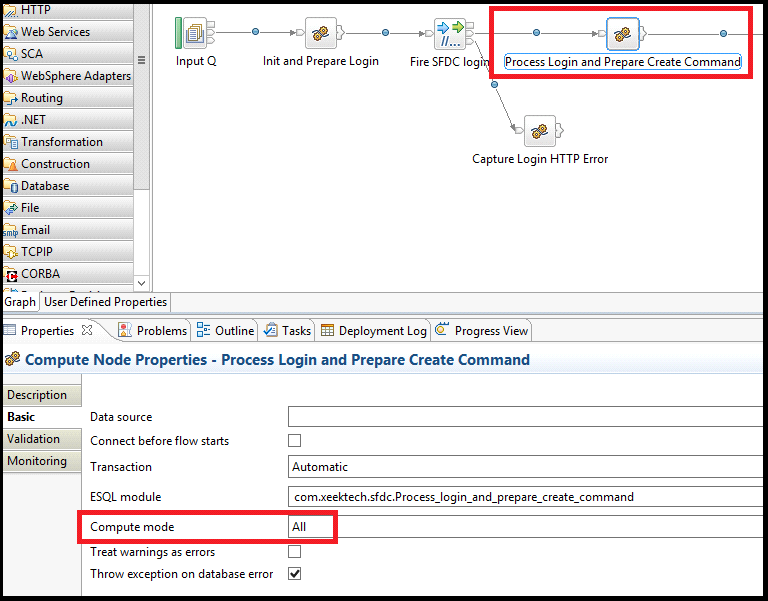
The message flow looks like this:
Design Time Settings
Following four user defined properties are used in this message flow:
UserName: Contains the SFDC account usernamePassword: Concatenated value, combining the password and the security token associated with the given accountClientSecret: Consumer secret, taken off the connected app that was developed earlier in SFDCClientID: Consumer key, taken off the connected app that was developed earlier in SFDC
In the Fire SFDC login http node,this URL is specified: https://login.salesforce.com/services/oauth2/token (this is the URL on which login needs to be attempted)
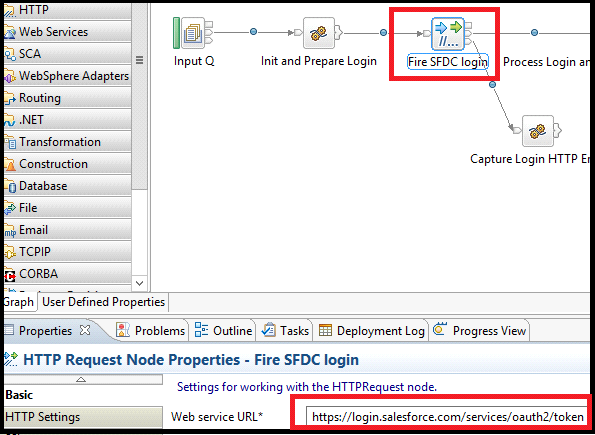
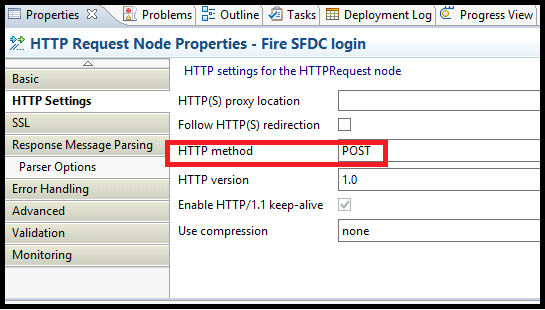
For both http nodes: Fire SFDC login and Fire Account Create, set HTTP Method to POST
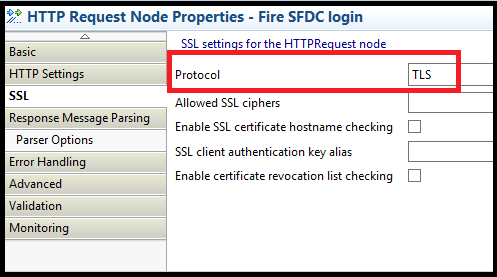
For both http nodes: Fire SFDC login and Fire Account Create, set the SSL protocol to TLS.
For both http nodes: Fire SFDC login and Fire Account Create, set Message domian to JSON: For JavaScript Object Notation messages in the Response Message Parsing tab

Set Compute mode to All (or at least LocalEnvironment and Message) for Process Login and Prepare Create Command Compute node
The Code
Initialization and login preparation
Hide Shrink  Copy Code
CREATE COMPUTE MODULE Init_And_Prepare_Login
    DECLARE UserName EXTERNAL CHAR;
    DECLARE Password EXTERNAL CHAR;
    DECLARE ClientSecret EXTERNAL CHAR;
    DECLARE ClientID EXTERNAL CHAR;
    CREATE FUNCTION Main() RETURNS BOOLEAN
    BEGIN
        --Init, preserving the contents of the source message in
        --Environment tree using the utlity methods defined above
        -- These contents are needed at different steps in the downstream processing
        -- The reason why these special copy functions are used is
        -- because the header trees (mqmd, mqrfh2 etc.) cannot be simply assigned
        -- to the Environment root only to be reassigned
        -- to any other tree in a given compute node.
        -- The reason is that these headers use
        -- special parsers [DOMAIN keyword with the parser name,
        -- e.g. DOMAIN(MQMD) or DOMAIN(MQRFH2) is used while 'creating' parsers and
        -- then the fields inside them
        -- More info on this topic can be found in this post:
        -- https://villein.wordpress.com/copyfolders-by-esql-reference/

        DECLARE rInput REFERENCE TO InputRoot;
        DECLARE rEnvironment REFERENCE TO Environment;
            --The following methods copies the source message tree to the environment root.
            --The contents are needed in
            --the subsequent processing steps
        CALL CopyAllFolders(rInput,rEnvironment,'TOP');

        --Now building the http post request for loging into SFDC.
        --Please keep in mind that we are using Username-Password OAuth
        --Authentication Flow in this case
        DECLARE _param1 CHAR ''; DECLARE _param2 CHAR ''; _
        DECLARE _param3 CHAR ''; DECLARE _param4 CHAR ''; DECLARE _param5 CHAR '';
        DECLARE _totalString CHAR '';
        SET _param1 = 'grant_type=password';
        SET _param2 = '&client_id=' || ClientID;
        SET _param3 = '&client_secret=' || ClientSecret;
        SET _param4 = '&username=' || UserName;
        SET _param5 = '&password=' || Password;

        --Combining all the above params
        SET _totalString = _param1 || _param2 || _param3 || _param4 || _param5;
        --Setting the URL
        --SET OutputLocalEnvironment.Destination.HTTP.RequestURL =
        --'https://login.salesforce.com/services/oauth2/token';
        --Setting the Content Type
        SET OutputRoot.HTTPRequestHeader."Content-Type" = 'application/x-www-form-urlencoded';
        SET OutputRoot.BLOB.BLOB = CAST(_totalString AS BLOB CCSID InputRoot.MQMD.CodedCharSetId);
        -- The command should assume this form:
        /*
        grant_type=password&client_id=3MVG9lKcPoNINVBIPJjdw1J9LLM82Hn
        FVVX19KY1uA5mu0QqEWhqKpoW3svG3XHrXDiCQjK1mdgAvhCscA9GE&client_secret=
        1955279925675241571&username=testuser%40salesforce.com&password=mypassword
        */
        -- CALL CopyMessageHeaders();
        -- CALL CopyEntireMessage();
        RETURN TRUE;
    END;

    CREATE PROCEDURE CopyMessageHeaders() BEGIN
        DECLARE I INTEGER 1;
        DECLARE J INTEGER;
        SET J = CARDINALITY(InputRoot.*[]);
        WHILE I < J DO
            SET OutputRoot.*[I] = InputRoot.*[I];
            SET I = I + 1;
        END WHILE;
    END;

    CREATE PROCEDURE CopyEntireMessage() BEGIN
        SET OutputRoot = InputRoot;
    END;
END MODULE;
Process login response and prepare the create Account command
Hide Shrink Copy Code
CREATE COMPUTE MODULE Process_login_and_prepare_create_command
    CREATE FUNCTION Main() RETURNS BOOLEAN
    BEGIN

        DECLARE _objectURI CHAR InputRoot.JSON.Data.instance_url; --URL of the instance
                                                 --associated with the given SFDC account
        DECLARE _oauthToken CHAR InputRoot.JSON.Data.access_token; --access token to unlock
                                                                   --the associated instance
        SET _objectURI = _objectURI || '/services/data/v30.0/sobjects/Account/'; -- setting the
                                                       --API version and the object on which the
        --insert/create operation needs to be performed, to the URL

        -- Setting HTTP params dynamically
        SET OutputRoot.HTTPRequestHeader."Content-Type" = 'application/json';
        SET OutputRoot.HTTPRequestHeader."Authorization" = 'Bearer ' || _oauthToken;
        SET OutputLocalEnvironment.Destination.HTTP.RequestURL = _objectURI;

        SET OutputRoot.JSON.Data.Name = Environment.XMLNSC.SFDC_Create_Source.Account.AccountName;
        SET OutputRoot.JSON.Data.AccountNumber = _
            Environment.XMLNSC.SFDC_Create_Source.Account.AccountNumber;
        SET OutputRoot.JSON.Data.Type = Environment.XMLNSC.SFDC_Create_Source.Account.Type;


        -- CALL CopyMessageHeaders();
        -- CALL CopyEntireMessage();
        RETURN TRUE;
    END;

    CREATE PROCEDURE CopyMessageHeaders() BEGIN
        DECLARE I INTEGER 1;
        DECLARE J INTEGER;
        SET J = CARDINALITY(InputRoot.*[]);
        WHILE I < J DO
            SET OutputRoot.*[I] = InputRoot.*[I];
            SET I = I + 1;
        END WHILE;
    END;

    CREATE PROCEDURE CopyEntireMessage() BEGIN
        SET OutputRoot = InputRoot;
    END;
END MODULE;
Process the create Account response into the outgoing response XML message
Hide Shrink Copy Code
CREATE COMPUTE MODULE Process_Create_Result
    CREATE FUNCTION Main() RETURNS BOOLEAN
    BEGIN
        -- Restoring Properties and MQMD from Environment to OutputRoot.
        DECLARE rOutput REFERENCE TO OutputRoot;
        DECLARE rEnvironment REFERENCE TO Environment;
        CALL CopyAllFoldersButLast(rEnvironment,rOutput,'BOT');
        SET OutputRoot.XMLNSC.Response.Id = InputRoot.JSON.Data.id;
        SET OutputRoot.XMLNSC.Response.Status = InputRoot.JSON.Data.success;
        -- CALL CopyMessageHeaders();
        -- CALL CopyEntireMessage();
        RETURN TRUE;
    END;

    CREATE PROCEDURE CopyMessageHeaders() BEGIN
        DECLARE I INTEGER 1;
        DECLARE J INTEGER;
        SET J = CARDINALITY(InputRoot.*[]);
        WHILE I < J DO
            SET OutputRoot.*[I] = InputRoot.*[I];
            SET I = I + 1;
        END WHILE;
    END;

    CREATE PROCEDURE CopyEntireMessage() BEGIN
        SET OutputRoot = InputRoot;
    END;
END MODULE;
There you have it. You can download the project file and go through the solution that way as well. You can also extend this project to fit your requirements.
Important Links
- Connected App Overview: https://help.salesforce.com/apex/HTViewHelpDoc?id=connected_app_overview.htm
- Digging Deeper into OAuth 2.0 on Force.com: https://developer.salesforce.com/page/Digging_Deeper_into_OAuth_2.0_on_Force.com
- REST API: https://developer.salesforce.com/page/REST_API
- Force.com REST API Developer's Guide: https://developer.salesforce.com/docs/atlas.en-us.api_rest.meta/api_rest/
- IBM Integration Bus 9 Info Center: http://www-01.ibm.com/support/knowledgecenter/SSMKHH_9.0.0/mapfiles/help_home_msgbroker.html?lang=en
- HTTPRequest Node: https://www-01.ibm.com/support/knowledgecenter/SSMKHH_10.0.0/com.ibm.etools.mft.doc/ac04595_.htm
- ESQL Reference: https://www-01.ibm.com/support/knowledgecenter/SSMKHH_9.0.0/com.ibm.etools.mft.doc/ak04860_.htm
No comments:
Post a Comment